What's Up, Cupcake? Menu

Saturday, October 30, 2010

Sweet Treats Saturday: Candied Orange Peels

Happy day before Halloween!  The chances of consuming a lot of sweet treats are high this weekend, but these will probably not be found in any of your candy bags.


I've always wanted to make candied orange peels, but was under the impression that they were hard to make and extremely time consuming.  After searching many recipes, I found one that proved otherwise.

The orange tree in our yard is in full bloom so I was lucky to have all of the materials on hand.


I followed the recipe exactly but only used oranges.  Some things to note:
  • Make sure you remove the rind to avoid the flavor from the final orange peels.  You don't have to go overboard (I did, I was super cautious and made the peels very thin).  If you make them too thin, the orange peels become capsules of sugar. Literally, it seems like you are eating sugar with a side of orange.
  • A variation of the recipe could include dipping this in chocolate.  I can't wait to try this!
  • The peels are sweet from being saturated with the sugar mixture, so you don't have to garnish with too much sugar.  


Straight from simmering in the sugar mixture.  Ready to dry for an hour.
The orange peels turned out delicious! I'm going to have to make them again but dip half of the batch in chocolate.

Friday, October 29, 2010

Featured Friend Friday! Just My Type Blogger: Jess

My first Featured Friend Friday!  About once a month, I hope to feature a friend or fellow crafty blogger on What's Up, Cupcake? For my first feature, I thought it would be fitting to interview Jess, as she has encouraged and inspired me to do many of the crafts that I'm now doing.  We met through the Scottish Highland dance community and discovered we both love crafty things.  She got me into knitting, cross stitching, and even back into sewing again!  

Jess and I after a long, but successful day of competing!


Enough with the love fest, read on and you can learn more about the awesome crafts Jess does.


Jess blogs at Just My Type. More details on how to see more of her crafty projects at the bottom of this interview.

What inspires you?
That's kind of hard question to answer, in that there is no specific thing. I tend to have weird taste in a lot of things. I am constantly looking for either beauty, weirdness, or both in the world around me. (I think my flickr favorites is a good place to see that combination in action.) I get very inspired by being able to combine two (or more) of the things I love in life.
For example:


finished TartanHearts pieces to date
Highland dance and cross-stitch


Clessidra
Highland dance and knitting: (one day it'll be argyle knee socks. not quite yet!)


hardcore/punk music and tattoos: (not my photo!)

Flirty Girl - Lucky Charms
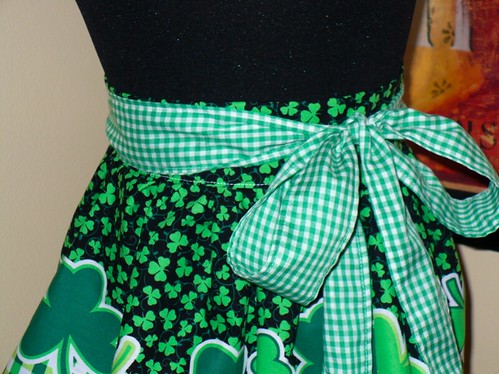
Irish-themed stuff and sewing

Rise above!  We're gonna rise above!
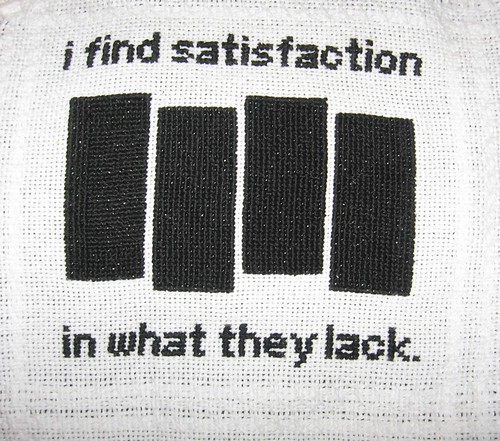
hardcore/punk and needlework
I also love things that make me laugh. Christine's Bedside Intruder cross-stitch is pretty high on that list right now. 

I'm also endlessly inspired by music. I listen to mostly hardcore and punk. I see bands I love every chance I get and had my dreams come true in getting to see the Cro-Mags earlier this year. I spend a lot of my weekends seeing bands in bars, garages, VFW halls, and wherever else I can. This doesn't come out as directly in my crafting as a lot of other things do. I'm hoping to change that, with the help of my cross-stitch pattern designing skills.

What is your craft space like? Where do you craft?
Complete and total chaos! I live with my parents, and thus have just my bedroom in which to craft. Which works for me. If it's not close and accessible when inspiration hits, I'll lose momentum or interest and projects will languish. I'm the kind where if I can't see it, it doesn't exist.

Let us in on your stash... what’s coming, what’s in progress, what are you stumped with?
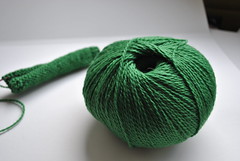
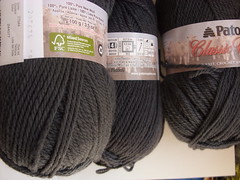
Well, I've got three sweaters worth of yarn that is practically begging to be knit with! As someone who really isn't a stasher, that's a LOT of yarn! I'm working on an Emelie with the Knit Picks Palette in Mustard. I've got the Palette in Grass (which I am in LOVE with) that didn't work out as a fingering weight Featherweigh Cardi. I've had the Patons Classic Wool in Mercury for a while, and can't totally decide on a pattern. 
I've also got a ball of Indisch Rot Wollemeise in my stash. It was a gift (!) and is so gorgeous. I'm thinking knee socks! 


wollemeise

I'm totally and completely stumped by the mass of yellow lace weight I bought during summer. I LOVE it; don't get me wrong. Yellow is my favorite color. 
Dandelion and Golden Glow comparison

What is your favorite craft to work with? (Sewing, knitting, etc)
I consider myself more of a knitter than anything. I do knit, crochet, sew, cross-stitch, embroider, blackwork, dye, and needle felt the odd thing. Lately embroidery in general, and cross-stitch especially, has been in the front of my mind. I seem to do better with crafts that are more linear (i.e. knitting and cross-stitch) than stuff that is more free-form (i.e. crochet and regular embroidery). After saying that, it probably comes as no surprise that I am someone who likes rules and guidelines and finds comfort in rituals.

What is your favorite thing that you’ve created so far?
Over-all, I think it's these blackwork samplers. I lost the fall/autumn pattern before I could do it, and kick myself all the time for that. I know I found them online somewhere. Ten years ago! (And seriously, if anyone knows where I could find the other one, I would be forever indebted.) I like summer the best. 
blackwork seasons samplers, summer

I also really love working with shrinky dinks. I love the way some of the rings I've made have come out. They're really delicate, but so cute and fun to make.

[365.2.53] more shrinky dinks
batty shrink ring


Knitting wise, it's my Pomatomus socks.
365.30

For crochet, it's the pink octopus that I made for my dear friend Kelley. I was supposed to make 10 for an event, and I'm so glad I never had to. 
oh no!

And sewing wise, it's definitely gotta be my Aboyne skirt and plaid. As a seriously horrible sewer, I'm super proud of it. I think a Jig dress is next for me. 
Scottish Lilt

Where can I read more? 
 

Thursday, October 28, 2010

Wish List: Mad Men Peggy Dress

While playing catchup with Mad Men episodes on our Tivo, I was instantly enamored by Peggy Olson's dress in episode 11.  I want to add this to my 'to sew' list but I need to begin a hunt for a similar pattern.


I love the blue/red combo, especially with the red peeking out in the skirt.  The two little buttons on the front are a fun accent.

Anyone have any pattern recommendations?  And what do you think of this season of Mad Men?

Wednesday, October 27, 2010

Super Easy Pet Blankets

Many of my friends have fur babies, and several became new parents this year. I’ve started assembling their Christmas blankets and as the weather starts to cool, it feels like the perfect time to work on this project.
Not only is this craft ridiculously easy and fast to whip up, but any extras you can make into blankets to be donated to your local animal shelter. The blankets are comfy, easy to clean, and pets will love them.  
My fleece choices. Two pattern pairs.
I am showing two options: non-sew and sew, but there are so many other combinations that you can do. 

Non-Sew Option

You can use one design where 1/2 - 1 yard will make one blanket.  If you use two different prints, you can probably get two blankets out of the fabric.

Two prints, wrong sides in the middle.
Once you have found a fleece design(s) that you like, cut into your desired size.  For a small to medium dog, I would recommend 36” square and move up from there.  Keep in mind that you’ll be losing 4” all around the blanket from the ties, so you may want to start large.  If you’re doing two patterns, cut out another piece into the same size.  

Cutting 4" strips around the side of the blanket, approx. 1" apart.
Place wrong sides together.  Cut 4” (approx... I’ve found that 4” or more work best to tie the knots) ‘strips’ 1” apart down each side of the blanket.  You will be cutting around the entire blanket.

Starting to tie double knots from the strips.
Once you have cut strips around the entire blanket, begin tying each pair (one from each side of the blanket).  I like to leave the last pair on each corner untied and snip them off once I have tied all of the ties.  I think it lays better that way.

Completed tie blanket.  If you trim longer strips around the edge, you won't have to tie your knots too tight and it will lay flat.  Just keep in mind the final blanket size when factoring in the size of your cut strips.
Sew Option
Choose your fabric (same as above instructions) and cut to desired size.  You don’t lose as much fabric around the edges so you can be closer to the actual size desired.  I use a 36” square for my medium size dog and it’s perfect for him.

Place right sides together and stitch the fleece together. I did a 3/4” edge.  Leave an opening in the middle of one side to invert the blanket inside out.

Opening to invert the blanket.
Once you have stitched all the way around, trim the corners so that they lay flat when inverted.  Turn the blanket inside out by pulling the fabric through the opening.  Finger press the sides flat and push the corners out.  

Pining the opening closed in preparation to stitch the edges.
Once you have flattened out the blanket, pin the opening inside in preparation to sew it closed.  Stitch the edge ultimately closing the opening and creating a small border.

Blanket complete! Showing double sides.
I like to just fold the blanket up, tie a bow around it and add a pet treat or toy.

Some finished blankets with their treats.
There you have it! An uber easy gift for your pet lover friends or your own fur baby.  

Wallace's new blanket is in place.
So comfy.


Tuesday, October 26, 2010

Kiss the cook

I have a thing for aprons... but that's another post.  In my hunt for cute apron patterns I came across the Sew Liberated Emmeline.  It's a reversible apron with a ruched top.  I love having options so having a double sided apron seemed to offer more bang for the buck.


This was another project that came together really fast.  It would be great to put together for a holiday gift.  I picked out two Amy Butler fabrics; one of which is actually the same one I used for the Frenchy bag.  I wanted to make sure that the fabrics I used had a corresponding color to tie everything together with the accent ties and top.

Monday, October 25, 2010

Who, Me? Owl Costume


The owl costume is finally complete and was ready for the weekend festivities!  Here are some pictures of the final costume.

I'm thinking about adding a belt, I just haven't found one that's called out to me yet.

In the end, the costume consists of:

Mask (made) 
Brown Dress (made)
Chevron Tights (Target)
Heels (not shown; Steve Madden)

You can read more about the 'made' costume pieces by clicking on the links to the corresponding items above.  They are previous blog entries.

The back of the feather cape.

I also wanted to be able to wear the dress after Halloween, so I paired it up with a cardigan and picked up a vintage sweater guard.  Through the powers of the internet, this was super easy to do.  A great place to look is etsy; I used the Designs by Annette shop.


So, whooo (or what) are you going to be for Halloween?


P.S. In case you haven't seen the Hungover Owls site, here you go: http://hungoverowls.tumblr.com/
And no, owning an owl as a pet is not recommended.  I checked. :)

Saturday, October 23, 2010

Sweet Treats Saturday: Bread Pudding

Carbs are one of the main food groups in our house, which leads to very few opportunities to use ‘day old bread’.  This past weekend, however, we had a bag of dinner rolls that was begging to be made into bread pudding.  I’ve always wanted to make it, so this presented the perfect opportunity.  I tweaked a few recipes to make this, but here’s the final, delicious recipe:


6 slices day old bread (I used six dinner rolls)
2 tbsp butter
1 tsp nutmeg
1 tsp cinnamon
2 cups of milk
3 eggs
1 tsp vanilla
1/2 cup sugar
1/4 cup brown sugar
8x8 baking pan
350 for 45 minutes
Preheat oven to 350 degrees.  Butter an 8x8 or equivalent baking pan.  Tear up pieces of day old bread into baking pan.  Melt the butter and drizzle over the bread pieces.  Sprinkle nutmeg and cinnamon over the bread and butter.

In a separate bowl, mix milk, eggs, vanilla, and sugars.  Pour mixture into baking pan and gently press down on the bread so that it absorbs the mixture.
Bake in preheated oven for approximately 45 minutes.  The middle of the bread pudding should bounce back when poked.
This came out great! Our friends were raving over it so now I need to find an excuse to keep day old bread around the house.

Friday, October 22, 2010

Amy Butler Frenchy Bag


This bag was a fun and easy accessory piece.  I used Amy Butler’s Frenchy Bag pattern and one of her floral prints for the exterior fabric.  The interior fabric was a coordinating green pattern that I found at my local fabric store.


I followed the pattern exactly for the shoulder sling length.  The only thing I would change would be the interior pockets.  They’re pretty large so once something goes in the bag, it’s pretty easy to get lost in there.


I love the snap closure and the bag is the perfect size.  I was able to complete it in one night with a few hours of sewing.


Thursday, October 21, 2010

Owl Mask

The owl costume is complete, but for now you get a peek at the final mask.  I’ll be wearing the complete costume this weekend at our first Halloween party of the season.

Extreme closeup

The mask has gone in various different directions.  Initially I was planning a feather covered mask with a basic ‘mardi gras’ frame.  After scouring the internet for more ideas and inspiration, I was most inspired by the recent Cirque du Soleil mask link combined with the idea of thick rimmed glasses.  My cape itself is all ‘feathers’ so I decided to skip the actual feathers and maybe use them as accents elsewhere.

First round of materials
Construction of the mask was very simple.  The materials I used included:
Sheet of felt
Various lace trims - depending on your design, less than a yard of each
Ribbon trim
Ribbon to attach the mask

Second round of materials.  All of the lace is black, it just looks purple in the light.

I wanted a sturdy mask so I folded the felt in half before cutting it.  Then I positioned it over my face making note of where I wanted to cut and what shape I wanted.  I outlined the idea of my shape, but when it came time to cut, I did so slowly, trimming only when I was sure it was still within the range.  I didn’t want to risk taking off too much, though depending on your trim, it can help cover any mistakes.  
When I had the mask in the right shape, I attached the ribbon to tie the mask and I began playing with various ways of layering the lace over the top of the felt.  Once I was satisfied, it was time to hand stitch.  This method made it very easy to change the design as I saw the mask come together.
In the end, I only used two types of trim.  The mask is very comfortable, unlike the original mardi gras mask.  I can’t wait to see the costume as a whole this weekend!

Wednesday, October 20, 2010

Simon and the sewing machine

A silly post for hump day.

My cat has been keeping me company during my long hours in the craft studio, and one of his favorite spots is directly on the sewing machine table.  This can be a problem, but he seems to keep to his corner out of my way.
I noticed he particularly likes it when I’m running the sewing machine and if I stop for too long he’ll turn and yell at me.  Here’s a little snippet:


Tuesday, October 19, 2010

She wore an itsy bitsy, teenie weenie...

Well, it’s not a bikini, but it is a polka dot dress!  I was inspired by a dress on display at my local craft shop.  I loved the fabric and had actually intended it for another project, when I remembered that I had an Amy Butler dress that I’d been wanting to complete.  

The pattern was incredibly easy! It was so fast to put together, with the only problem I encountered being that I didn’t realize it was supposed to have lining.  Somehow I missed that part when purchasing the fabric, cutting the patterns, and reading the directions.  Luckily the fabric I used was a nice cotton that wasn’t too thin.  I had my heart set on completing the dress so I decided to omit the lining.  I think the seams would have been nicer with it, but the brown thread complemented the design.  


I’m also not a huge fan of fitted short sleeves so I tried it on without the bias edge... and really liked the look.  So I left them out.  
Overall I’m extremely pleased with this dress and pattern.  I can definitely see myself using the pattern again with some other fun combinations, or even in a solid.  I love the vintage, classic look of the dress.  

Lovely image of the trash can behind me.  Apparently it was too early to notice such details.  Oh, and it definitely needs to be pressed.


The finishing touch? A green flower pin that I've had sitting in my jewelry box for years.  I bring it out occasionally but I think it's found a new home on this dress.
Related Posts Plugin for WordPress, Blogger...