What's Up, Cupcake? Menu

Thursday, February 02, 2023

Let me write that down...

This past summer, I started bullet journaling after a friend shared how it had helped keep her organized while using her creative skills. Well, really, it all started when she showed me her sticker collection. Prior to that I had dismissed the idea of bullet journaling because 'I didn't need another hobby.' As a long-time Lisa Frank fan and sticker collector (I still have my sticker album from childhood), talk of 'stickers' instantly piqued my interest. I tumbled into the bullet journaling rabbit hole.

An Archer & Olive journal opened up to a monthly recap page for September.
One of my Archer & Olive monthly recap layouts.

For those who are not familiar with bullet journaling, it's essentially a glorified planner or decorated notebook where you can write lists, keep notes, track activities... it can really take any shape that you want. I first started with an Archer and Olive bullet journal because that's what my friend used. It's a dot grid notebook on heavy paper that allows you to draw, paint or color, sticker, tear pages or layer designs, etc. It's a blank canvas that you can use to express yourself in any ways possible. I'll admit, that this was a daunting thought. I have never considered paper crafts to be a strong point, but surfing Pinterest made me think this could be a hobby for anyone.

A two page layout with illustrations of bins and houseplants on shelves. Bins have text indicating yarn and projects I'm working on.
A journal spread I made to track yarn projects.

After filling a couple of journals over the course of a few months, I realized this was definitely an outlet I could get behind. I also started to follow more vendors in the bullet journaling space and realized how many options were out there in terms of notebooks, labels, layouts, stickers, and more. I made a big shift at the end of 2022 away from Archer and Olive and in to the more structured space of the Hobonichi planners. Hobonichi planners are Japanese made planners that use an ultra thin paper (Tomoe River paper), and has a few layouts that can include daily, weekly, and/or monthly layouts. I went with the Hobonichi Techo Cousin Avec. That's a mouthful. What it breaks down to is two six-month planners that include monthly, weekly, and daily formats. While I'd prefer to have a 12 month planner, the divided planner helps to account for the fact that it can get pretty bulky, especially if you're loading it with additional materials like stickers. I would like to be able to carry my journal when I'm working or if I'm planning something like as part of a kids school activity, so I went with the broken down version.

Two pages in my Hobonichi in the weekly layout section. Various stickers and text indicating activities for the week.
An example weekly spread in my Hobonichi Cousin Techo planner.

So far I have been thrilled with the Hobonichi format. I love having the planner functionality with the structure of a calendar, but also the daily pages to write events, notes, or any other thoughts from my day. My sticker collection has also grown immensely, with some of my favorite independent sticker makers being:

The Coffee Monster Co.
Once More with Love
Every Minute a Story
Moody Cats Design Co
Shine Sticker Studios

Two daily pages in my Hobonichi planner with stickers and text.
An example of my daily layout and sticker usage in my Hobonichi Cousin Techo.

There are honestly so many more, but I tend to order from those the most.
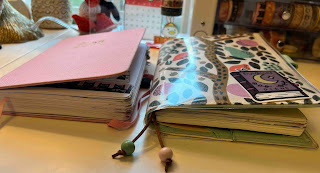
A pink, full Archer & Olive planner next to a covered Hobonichi Techo Cousin planner.
Archer & Olive journal on the left, vs the 6 month Hobonichi with a cover on the right.

This has then created the issue of sticker storage, of which I've tried a few different solutions. So far, a hinged ArtBin case with dividers has proven the easiest to use and navigate. Before that I had been using a binder with protected sheets, but I was constantly running short on space and it was spreading over multiple binders. At the moment, I can contain everything within my one case with room to grow. Thankfully, I use a lot of stickers daily, too, so I have been good at using my collection. It's not a necessity, but I find the act of daily journaling and my weekly planning to be a grounding part of my day. When I'm feeling overwhelmed, I can take a moment and see what I've already captured, or what I might want to write down or doodle about to refocus and gather my thoughts.
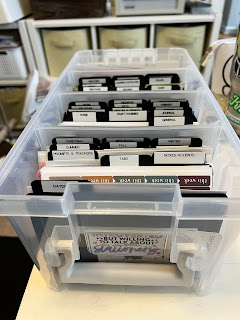
A plastic storage bin with handle and lid. Dividers labeling various sticker categories with sorted sticker sheets.
My ArtBin case with a hinged lid and dividers that I made on my Silhouette.

I also didn't make a complete transition away from my original journals. I still use my Archer & Olive notebooks for my work notes. The simplistic design has made it easy to capture my tasks and meeting notes daily. Sometimes I'll throw a sticker in my work notebooks, but usually, I keep it pretty concise.

My journaling has gone so far as to get me to sign up for a planner conference in March. I'll be going with my OG journal friend to the Go Wild conference in DC. I don't know quite what to expect, but I can't wait to meet with other journal-obsessed individuals, and I've heard the swag and parties are amazing. I'll definitely post about it afterwards... well, if anything I will journal about it.

Image of the purple GoWild attendee box with a crochet llama beside it. Pens in GoWild colors sit on a journal on the table in front of it.
My Go Wild attendee kit and a llama I made for the Go Wild theme.

Are you into journaling or collecting stickers? Share your favorite vendors. If you aren't, would you give it a go or does another solution work for you?


This site contains product affiliate links. We may receive a commission if you make a purchase after clicking on one of these links.

Monday, January 30, 2023

House (Site) Cleaning

It's been a minute... to the point where I forgot how to even access this space. I'm excited to share that I'm still here, just with a lot of life updates and changes.

So much time has passed, that it might be best to do a quick review of what's been going on:

  • The boys are now 8 and 9.
  • We're still in the Raleigh area, and still absolutely love it. It has definitely become home, and I'm thankful for our lives have evolved here in the last 9 (what, 9??) years.
  • I'm still keeping up with crafts, but they've also evolved with the growth of activities in our lives.
Let's dive into that last one a bit. I'm doing less sewing and baking, but lots of needlework crafts: knitting, crochet, cross-stitch, etc. More so because those projects are portable and often quick to complete. We do a lot of camping (we bought a camper, sold it, and got a slightly bigger one!), so all of those crafts are very conducive to traveling and transporting them on the go.

Around the middle of last year, I also started bullet journaling. A co-worker had gotten me into it and it helped me feel a little bit of control with chaotic life activities. Bullet journaling also appealed to my sticker-loving, pen-hoarding heart, so it was a no-brainer that I'd instantly become obsessed with it. It's help in juggling kids activities, my hobbies (beyond needlecraft, I've also taken up tennis, and I'm still doing a lot of workout coordination and planning), and of course, I have to pay the bills, so work task management.

I'll occasionally post with craft updates and maybe some favorite recipes. 

Sunday, October 29, 2017

Turtle Power... or more specifically, Halloween 2017

Halloween appears to be the only thing that can motivate me to be consistently crafty. Actually, I recently started crafting again with a group of girlfriends with the plan to get together once a month to socialize and work on projects that we haven't been making enough time for. That has definitely been a step in the right direction to getting back on the crafting train. But every year now, around August, I get the bug to start working on Halloween costumes.

This year, I had big plans.


When I was a kid, my mom made all of my Halloween costumes. One particularly memorable year, I wanted to be a ninja turtle. She showed me the pattern envelope (Butterick 5143) and I confirmed that it would be the perfect costume. See below. Can you blame me?

Front of the pattern... I still think my confusion was very warranted.
Little did I know that the front of the envelope looked much different than the costume itself. Mainly, the 'mask' of the turtle involved your head being the mouth of the turtle.

Clearly, you can see how I wasn't expecting this from the front of the envelope.
When it came time to don this outfit, I was not impressed. I looked enviously at the other kids in my school that had their store-bought turtle costumes  and was so envious.
Clearly, I was pleased.
Now, older and slightly wiser, I still look back at that picture and laugh. So it's only fitting that I wanted to have my kids wear that same costume, especially as I've been brain-washing them into loving the ninja turtles as much as I did. So I hunted down the original pattern. Thankfully, eBay had several sellers offering it. My plan was to make a whole set for the family in time for Halloween.

Unfortunately, I dragged my feet on starting the costume. While I purchased my fabric pretty early on, I waited until mid-September to start assembly, thinking a month would be plenty of time. But our weekends are pretty jam-packed already, as are weeknights with my teaching schedule. So I waited until my mom came to town and we cut out and assembled the main jumpsuit for the boys. I had already traced out some pattern pieces on Swedish tracing paper so that I could use the various pieces over for each size variation. The boys could both be based off of the smallest pattern size, and James and I could use the largest for our accessories. I purchased a separate pattern for our jump suits.

In the time it took from me purchasing the fabric and beginning the assembly process, I apparently forgot what was required. My mom and I put together the jumpsuits in a thick dark green fleece. Later that week, after she left, I went to work on their shells... only to realize I had used the shell fabric for the jumpsuit and had a whole, unused bolt of a lighter green cotton that I was supposed to use for the main body piece. Much cursing ensued.

Fitting for the costume. The head wasn't stuffed yet but a view of the shell.
I salvaged what I could of the dark green fabric and thankfully, having already made the main pieces two times, the next two went much faster. Overall as I made each pattern section the second, and then third time, I became much more efficient... though it was still one of the most time consuming clothing projects I've done. I have so much respect for the amount of time my mom spent on our costumes. The hardest part was probably the hood, though the shell was the most time consuming due to the amount of hand-stitching required to baste the designs into the shell.

I ended up finishing the costumes for the boys on Sunday the 21st. I was so disappointed that I wasn't going to be able to make our costumes in time for Halloween festivities that Friday, but especially mine as I wanted to recreate my original Michelangelo costume. I decided to bite the bullet and go for just one more. I ended up working on it all day Sunday and then Monday and Tuesday evenings. There was no way that I could finish the fourth turtle so I went ahead and ordered the villain, Shredder, from Amazon. I think if I had a complete full day again in addition to the evenings, I would have been fine but our next weekend was already booked with costume instances so there was going to be no way to get that time. It ended up working out perfectly and the boys loved having the 'bad guy' to mock play with.

The boys loved following along with my progress and trying on the pieces as they were completed.
I wanted to take some pictures of the family all dressed up in some sort to urban or sewer/tunnel type setting. Obviously without going into a sewer. I had thoughts of a few tunnels I go through on regular weekend runs but my friend suggested the Free Expression Tunnel on NC State's campus. It's not too far from us and online pictures looked promising. We headed over there on Friday afternoon after the school Halloween parade.

I was not expecting it to have quite so much foot traffic. While the tunnel was really cool, and felt like the perfect backdrop, it was a steady stream of students walking around campus. I almost called it quits but after a quick texting session with my friends, they convinced me to do it. The kids had so much fun during our little photo shoot and didn't want to take their costumes off after. We received plenty of stares and laughs from the students, most of which seemed to be quite familiar with the ninja turtles.


We have a few more Halloween festivities coming up so I'm looking forward to getting as much use out of these costumes as possible.
SaveSave

Sunday, August 13, 2017

A mouse took a stroll through a deep dark wood...

This post is late. More than late... It's two years overdue. But as they say, 'better late than never...'

Back in good ol' 2015, I had a two year old and a 7 month old, and was wondering what I would dress them up as for Halloween.

I knew my time in selecting their costumes without a fight or their opinions was pretty limited, so I wanted to make it good. We had been reading a lot of Julia Donaldson books and...


I wanted a costume due that would work with the two of them, so my heart was pretty set on making the Gruffalo and the Mouse. The problem being, it's a British book/show and I'm in the US. At the time, I believe the film was either pretty new or a little harder to acquire here. And my costume options were looking pretty limited. Those that I could find were going to have to be imported and were pricey, or were for an age and size greater than my two year old. I decided to start checking out Pinterest and similar sites for inspiration and even then, I found it lacking. So I decided to make my own version.


For the Gruffalo, I took the Simplicity pattern 1351, version B (hedgehog) and modified it a little. I used the side spikes for inspiration of the purple 'prickly spikes down his back', and referred to the book for reference to his facial features.


For the mouse, I had a slightly easier task as I could make some minor tweaks to Simplicity 2506, version D (mouse), and just change the coloring and the bowtie.

Both costumes were fairly simple to assemble, with the greatest challenge being in piecing together the Gruffalo from the book. Thankfully, it's beautifully illustrated and the description given is so clear, that it made it easy to pull together.


I started the costumes in August and had more than enough time, sleep-deprived and all, to pull them together. By the time Halloween came, the boys looked perfect and were cooperative in their costumes. I used felt as the main material for both costumes which is perfect for how our Halloween's have been trending here in North Carolina. Not too cold, but it definitely starts to get chilly at night. The Gruffly has definitely gained in popularity since then so is a bit more recognizable, but I'll admit that at the time, Big Fig was dubbed 'a cute monster' by most who saw him. But I was so pleased with the outcome.


I'm excited for this year. I went shopping today for the materials for our Halloween 2017 costumes. Yes, 'our'. I'm going for a whole family theme. We did one last year and it was a lot of fun. They were all store-bought but the process was still pretty stressful, which encouraged me to try making them myself this time. That and once again, I'm thinking my influence on costume selection is limited. This might be the last year I can sway Big Fig into his costume choice so I'm going big. So stay tuned. I promise to update soon with more details, this time as I actually piece it together.


Thursday, June 12, 2014

Quiet Book: Mr. Potato Head

One of my crafting challenges that I've set for myself this year, aside from just getting back into crafting, is to create a quiet book for Ian. If you've never heard of a quiet book, it's essentially a book, usually made of felt, that has little activities, puzzles, and games for your toddler/preschooler to play with.  It's great for car rides and I think the original purpose was for kids to have something to keep them quiet at Church.

There are some amazing quiet book inspiration pages out there and I have a whole Pinterest page dedicated to it. You'll also find a lot of blogs with instructions or whose sole purpose is the quiet book.  I found one such blog that had fun templates like a Mr. Potato Head activity page.  I decided that seemed pretty simple and would be a good starting point.

You can get the templates to make your own Mr. Potato Head quiet book pages here.  Once I downloaded the templates, I cut out the various pieces to assemble my quiet book.  I ordered my felt from Etsy - I found they had the greatest selection of colors to choose from and reasonable prices.
I also have a very extensive collection of embroidery thread. This isn't even the full amount - I have a lot pulled aside for current embroidery projects.  I used a combination of hand-stitching with embroidery threads (especially on the small pieces) and my sewing machine on the large pieces.


I made a whole bucket of various pieces to attach to Mr. Potato Head.  They all get stored in the bucket and Ian can pull them out and piece them on to the potato in whatever way he chooses.
My goal is to create one quiet book page or set of pages for Ian a month until his second birthday. By then he should be about ready to really enjoy the quiet book and he'll have a whole set at that point. I've already completed some of the next pages so I'll share those shortly.
Related Posts Plugin for WordPress, Blogger...