
These make perfect party favors, gifts for co-workers (especially when you don't want to just leave a cupcake out in the open on their desk), teachers gifts, etc.
What you'll need:
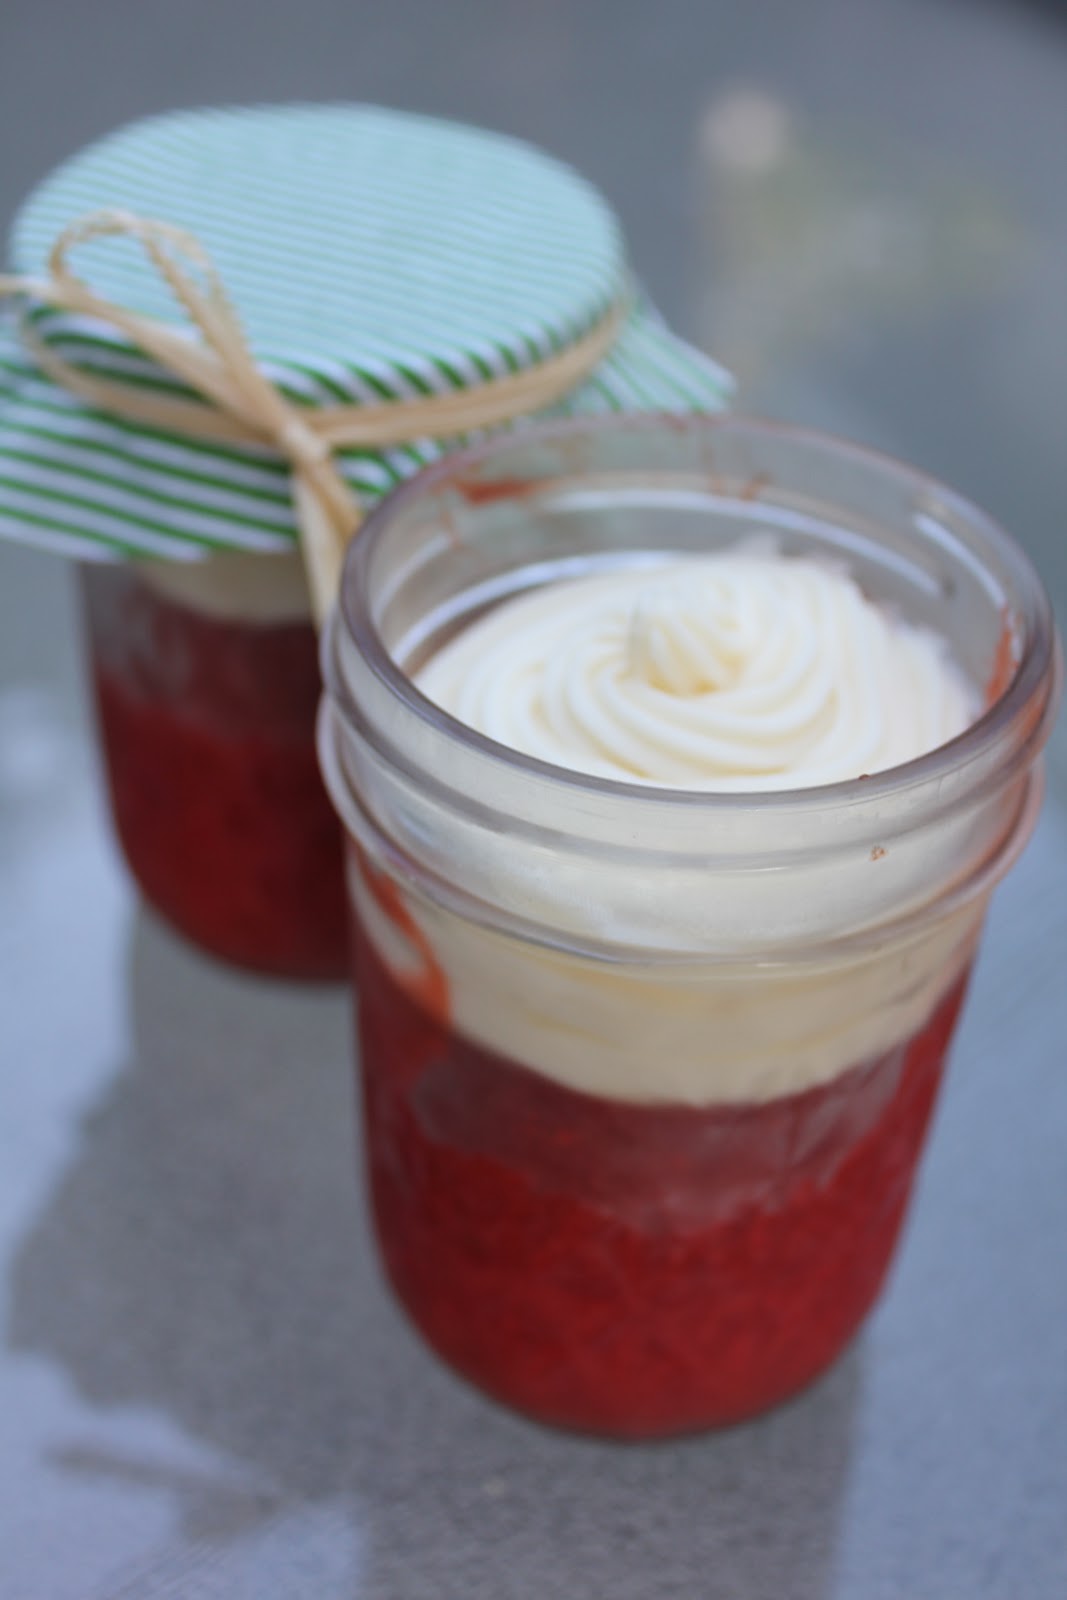
- Canning jars. I use a minimum 8oz jar as that will hold a standard cupcake. You can go larger, but consider cooking time, and how to balance the contents.
- Cake batter and frosting. I made red velvets as they're a great color for the holidays, and can look really good with a contrasting green fabric top. You can also make blue velvets, funfetti cupcakes, or really anything that you like.
- Decorating supplies. This can be fabric scraps and raffia, ribbon, or even simple card stock cut to fit into the lid of the jar.
Red Velvet Cupcakes with Brown Sugar Cream Cheese Frosting
Recipe from Goodies by Anna
This recipe will make about 2 dozen cupcakes, or the same amount in 8oz jars.
Cupcake Ingredients:
2 1/2 cups cake flour
1 1/2 cups sugar
1 tsp baking soda
1 tbsp cocoa powder
1 tsp salt
2 eggs
1 1/2 cups vegetable oil
1 cup buttermilk
2 tbsp (1 oz) red food coloring
1 tsp vanilla extract
1 tsp white distilled vinegar
Preheat the oven to 350 degrees.
Sift together the flour, sugar, baking soda, cocoa powder, and salt in a medium bowl.
Beat eggs, oil, buttermilk, food coloring, vanilla and vinegar in a large bowl with an electric mixer until well combined. Add dry ingredients and beat until smooth, about 2 minutes.
Pour batter into the individual cupcake pans or jars. The same amount of batter would be used for a jar. It should only fill about a quarter full - keep in mind that the jar does not have a wider top portion like a standard cupcake, so it does rise a bit higher. You still want enough room for frosting.
 |
| The batter on the left, baked cupcake on the right. It more than doubles in size. |
Bake cupcakes until a toothpick inserted in the center comes out clean, about 20-25 minutes. Let cakes cool completely before frosting. If you baked them in the canning jars, it will take about an hour before they are cooled enough to add the frosting.
Frosting Ingredients:
*This is the edited frosting to make half a batch. Goodies by Anna posted the original recipe with the comment that it made far too much so to half it in the future.
3/4 cup butter (one and a half sticks), softened
8 oz cream cheese, softened
2 tbsp light brown sugar, packed
1/2 tsp vanilla extract
pinch of salt
2-3 cups powdered sugar
1-2 tbsp milk depending on desired consistency
Cream the cream cheese in a medium bowl with an electric mixer for 1 minute. Scrape down the bowl and add the butter, beating for 1-2 minutes, or until incorporated.
Add the brown sugar, pinch of salt, and vanilla extract, and beat until blended.
Turn off the mixer and gradually add the powdered sugar, mixing well in between each addition. Alternate adding the sugar and milk until the frosting is smooth and has reached your desired consistency.
Once the cupcakes are cool, you can pipe the frosting on. You can do this with a pastry piping bag, or with a regular plastic bag with a tip cut off. If it's going into the jar, it doesn't need to look fancy. Once the cupcakes are frosted, seal the jars and decorate.

I cut out circles slightly larger than the jar lid from scraps of fabric. Hold down and tie with raffia or ribbon. You can also attach a spoon to make enjoying the gift easier.


This post will be participating in the following Linky parties:
Tatertots & Jello * Think Pink Sundays * Sundae Scoop * Sunday Showcase Party *Watcha Got Weekend * Family Ever After * Nifty Thrifty Sunday * Making the World Cuter * Home Savvy * Just Something I Whipped Up * Made by You Mondays *Sew Cute Tuesday * Talent Tuesday * We Did It Wednesday * Hoo’s Got Talent * Look What I Made * The Trendy Treehouse * Thrilling Thursday * It’s a Hodgepodge
I wanted to pick this off the screen and eat it. What a great gift these would make. I wonder if you would post this at my Sunday's Best Party open Sunday at 2 am. Sure hope you will, too cute not to share!
ReplyDeleteI have pinned a few of these jarred cakes on my pinterest but am yet to try them. Your Red Velvet version looks amazing!
ReplyDeleteI have posted about a few of my favourite Christmas pins on my blog so if you have 5 Minutes to spare please pop by!
Best wishes,
Natasha @ 5 Minutes Just for Me
What a great idea! These would make perfectly yummy teacher gifts! Thanks for sharing!
ReplyDeleteAngela
Ahh, great minds think alike. I made something very similar for my son's bake sale 2 weeks ago, link below. Between the icing and red velvet I poured caramel sauce used for icecream topping (it called for Nutella which would have been delish but there's a no nut policy). Hope you visit to see. Can you believe, they sold them for $5 per jar!!!!
ReplyDeletehttp://feellovdeveryday.blogspot.com/2011/10/goodbye-week-hello-weekend-lessons_14.html
Thanks for sharing! How long can you keep them in the jars before the need to be eaten? I am a new follower from Making the World Cuter Monday. Vicky from www.messforless.net
ReplyDeleteI love this ideia! Thank you for sharing!
ReplyDeletehttp://www.remax.pt/pro
yummy come see me at http://shopannies.blogspot.com and see what I shared
ReplyDeleteFun idea and great tutorial! I am in love with all the cupcakes in a jar I have been seeing on the internet, but I haven't tried it yet!!
ReplyDeleteHi,
ReplyDeleteI'm a new follower from the Tredy Treehouse Link Party. I love this idea and it will make awesome gifts to pass out to friends and family. I will also like to add this to my freezer cooking menu for desserts. i usually just bake a cake, cut, wrap and store them in the freezer, but this looks better. I may even use whip cream instead of frosting..thanks!
Stop by anytime